
|
There are some decisions that should be made early that will save time and trouble down the road. You should decide on the location of electrical and plumbing, and contracting with professionals if you cannot do that work. If your house is within the city limits, many things have to be done up to local codes. Therefore, it is important to identify early the tasks that you are capable of doing, and then contract with professionals to do the rest. In addition to the electrical and plumbing, some of these things may include windows, doors, floor covering, fans, lighting fixtures, cabinets, kitchen appliances, bathroom fixtures, hot-water heater and so forth. Another very important factor is to find a good source of supply for the landscape timbers and other building materials. It should be stressed that building a house from landscape timbers provides great flexibility. The structure can range from a small cottage or cabin on the lake, or in the mountains, or a residence with 1000 sq. ft. living area to one over 5,000 sq. ft. It can be built with more than one story or a loft with a vaulted ceiling. People who live in dry, arid regions of the country may have trouble finding the timbers, and if they do the cost might be prohibitive to have them shipped, so improvise and use another kind of material for the walls.
This is a labor-intensive house, so you can save a lot of money if you can do some or all of the work yourself. Regular construction and building tools are all you need, but if possible get a 'radial arm' saw, as this will help greatly in cutting the timbers. As the foundation is prepared, whether slab or sub-floor, build a number of A-frames using a straight 2' X 4' stud to place every 8 feet, all around the parameter. With a helper, hold the 2' X 4" in a perpendicular position, then place another 2' X 4" on the floor and nail or anchor it down. At this point all you do is run a 1" X 4" X 10' board from the top of the stud to the far end of the flat 2' X 4' and nail it in place. Be sure the stud is plumb and in the proper position. This creates the A-frame and serves as a guide for the timbers as the walls go up to keep them straight and in line.
As the walls take shape, be sure to leave openings for the windows and doors that will be installed later. Get these dimensions from your local supplier. The timbers should be nailed in place using 6 inch pole barn nails. These nails are 'threaded' on the end and as they are driven, they pull the timbers together very tight. To make the nailing go much easier, drill a 'pilot' hole every 2' to 3' apart along the timbers. The bit should be just a little smaller than the nails. This will give you leverage and reduce the number of nails that you WILL bend. Another trick is when two walls meet, angle the drill bit and tie the walls together every two or three timbers as the wall goes up. The wiring for the switches and outlets can run inside the timbers by drilling holes.You should keep in mind that the wiring must come from the top, or from the attic, or from under the house where there is crawl space. You can probably see now why building on a concrete slab is much harder. You can drill down through each timber to the desired spot, for the switch or outlet, or hide them under the door or window facings. A good trick here is to have extra wide facings and cut holes and mount the switches and outlets right into the window or door facings. Use your imagination here. That's the beauty part of building a house out of landscape timbers because you have the option to make them any width you want them to be.
|
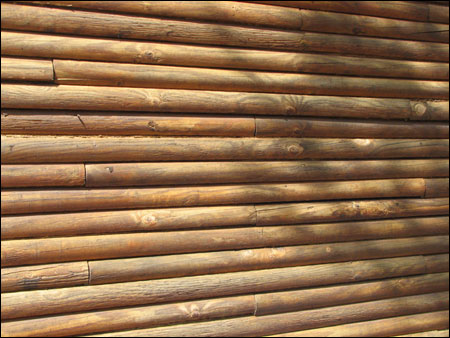 Because the timbers are each 8 ft. long, you can be as creative as you want to be. Obviously, building the walls with dimensions divisible by 8 would be more cost effective. For example, a house with the dimensions of 48' X 32' would be easier to build than one with walls that are not standard, with offsets and bay windows. It takes 30 landscape timbers to make a wall 8 feet high. When you have 30 timbers nailed together, with insulation between them, you have a wall 8 feet by 8 feet. The timbers should be cut and staggered at 2 ft.-4 ft.-6 ft. and full length intervals, as the layers go up, to make the walls more attractive and much stronger. In our house we also used the timbers for all the inside walls which was a nice, attractive and cost effective touch.
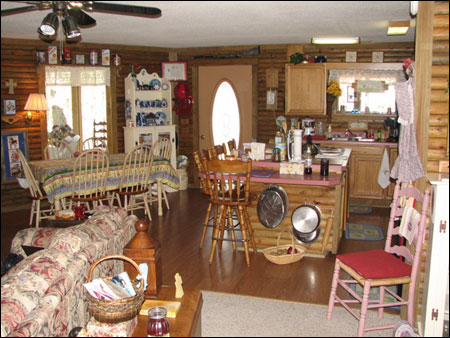 Some of the timbers will vary in size, so this will also keep them flush on the inside of the wall. This will be very important when you build cabinets and hang pictures By looking at your plans and doing a little multiplication, you will be able to figure out how many timbers you would need and by pricing each timber, you should have a rough idea of the cost, at least to build the walls. I'm sure prices vary in different parts of the country.